



 View All
Everything candle makers need to know about Candle Dyes
ameravantColor is one of the easiest ways to give handmade candles a distinctive look. Whether you want a soft pastel, a rich seasonal shade, or a custom color for your candle collection, choosing the right candle dye and using it correctly can make a noticeable difference in the finished product.
However, coloring candle wax is not always as straightforward as it looks. The same dye may appear darker in paraffin wax, softer in soy wax, and slightly different after fragrance oil is added. The color of melted wax can also look much deeper than it will after the candle has cooled.
This guide explains the different types of candle dyes, how to add dye to candle wax, and how to test your colors before producing a complete batch.
What Is Candle Dye?
Candle dye is a concentrated colorant formulated to dissolve or disperse in melted candle wax. It is available in several forms, including dye chips, blocks, flakes, and liquid dyes.
Unlike water-based food coloring, candle dye is designed for wax-based products. Because food coloring does not properly combine with wax, it may separate, settle or create uneven results. Crayons are also not recommended for coloring candles because their pigments and additives may interfere with wick performance.
For the most consistent results, use a colorant specifically intended for candle making.
Types of Candle Dye
The best candle dye depends on the type of wax you are using, the color you want to achieve and the size of your candle-making batch.
Candle Dye Chips
Candle dye chips are concentrated pieces of solid dye that are easy to measure, store and add to melted wax. Their convenient size makes them a practical option for beginners, small-batch candle makers and experienced makers who want repeatable results.
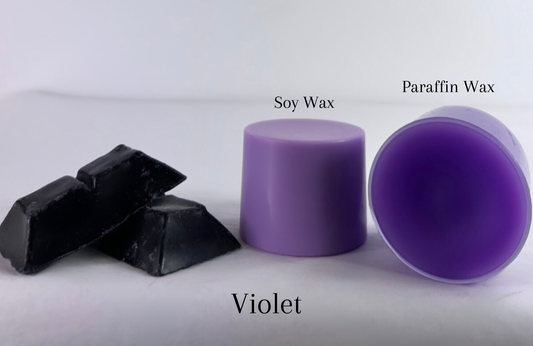
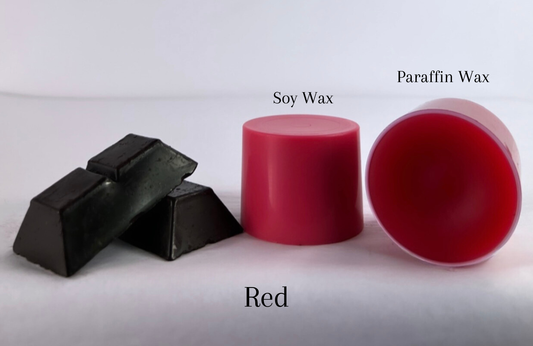
General Wax diamond-shaped candle dye chips are available in a wide variety of colors. Each package contains 20 chips and can color approximately 10 to 11 pounds of wax, depending on the wax, selected color and desired shade.
Use fewer chips to create a lighter shade or gradually add more for a deeper color. Always record the amount used so you can reproduce the color in future batches.
Candle Dye Blocks
Candle dye blocks are concentrated solid colorants that can be shaved or cut into smaller portions before being added to melted wax.
Blocks are useful for candle makers producing larger batches or experimenting with custom shades. Because the amount added can significantly affect the final color, weighing the dye provides more consistent results than estimating by sight.
Liquid Candle Dye
Liquid candle dye is highly concentrated and convenient for precise color adjustments. Because it is measured in drops or by weight, it can be useful when developing a repeatable candle formula.
Liquid dye blends into melted wax without requiring you to cut or shave a solid block. Begin with a small amount, stir thoroughly and add more gradually until you reach the desired shade.
Remember that liquid wax generally appears darker than cooled wax. Test a small sample before adding additional dye.
White Candle Dye Flakes
White candle dye flakes can help brighten candle wax or create a whiter-looking finished candle. They are particularly useful when the natural color of the wax is more ivory, cream or yellow than the desired result.
The final shade will still depend on the wax, fragrance oil and additives used. A small test batch is the best way to determine how white dye flakes will perform in your formula.

How to Use Candle Dye Chips
The exact process may vary depending on the wax and dye, but these general steps provide a reliable starting point:
1. Measure the wax. Weigh the wax before melting so you can calculate and record the dye amount used.
2. Melt the wax completely. Follow the recommended melting instructions for your particular wax.
3. Add a small amount of dye. Place the candle dye chips into the fully melted wax while it is warm enough for the color to dissolve properly.
4. Stir thoroughly. Continue stirring until the dye is completely incorporated and no visible pieces remain.
5. Test the cooled color. Place a few drops of colored wax on white parchment paper, a white plate or another heat-safe surface. Allow the sample to cool completely before evaluating it.
6. Adjust gradually. If the cooled sample is too light, add a small amount of dye and test it again.
7. Record your formula. Write down the wax type, wax weight, dye color and amount of dye used.
Always follow the instructions provided for your particular wax and candle dye, as recommended temperatures and usage amounts can vary.
How Much Candle Dye Should You Use?
There is no single amount of candle dye that works for every project. The correct amount depends on:
• The type and natural color of the wax
• The form and concentration of the dye
• The specific dye color
• The desired color intensity
• The amount and color of the fragrance oil
• Other additives in the candle formula
Begin with a conservative amount and increase it gradually. Adding more dye is easy, but correcting an overly dark batch usually requires adding more uncolored wax.
For consistent production, weigh your wax and dye instead of relying only on the number of drops, chips or shavings. Detailed batch notes will help you recreate successful colors and avoid unnecessary testing later.

Candle Dye in Soy Wax vs. Paraffin Wax
The same candle dye can produce different results in different waxes.
Soy Wax
Soy wax naturally has a creamy or opaque appearance. As a result, candle dye often produces softer, more muted or pastel-looking colors in soy wax.
Very deep shades may require additional dye, but adding excessive colorant can affect candle performance. Test both the appearance and burn quality before increasing the amount used.
Paraffin Wax
Paraffin wax often produces brighter, deeper and more saturated colors than soy wax. Because the wax can have a clearer appearance when melted and a cleaner white base after cooling, dye colors may appear more vivid.
This difference does not mean one wax is better than the other. It simply means that the color formula may need to be adjusted for the wax being used.
Wax Blends
Coconut, soy-paraffin and other wax blends can produce results somewhere between those of pure soy and paraffin. The percentage and natural color of each wax in the blend will influence the finished shade.
Always test the dye in the exact wax blend you plan to use for production.

Why Does Candle Wax Look Different After Cooling?
Colored wax frequently looks darker while melted and becomes lighter or more opaque as it cools. This is normal.
The final appearance can also be affected by:
• The natural color and opacity of the wax
• The amount of dye used
• The fragrance oil
• Candle additives
• Cooling conditions
• The color and transparency of the candle vessel
• The lighting in which the candle is viewed
Evaluate the color only after the wax has cooled completely. If you are developing a product for sale, inspect it in both natural and indoor lighting.
Does Fragrance Oil Affect Candle Color?
Some fragrance oils are clear, while others have a pale yellow, amber or darker appearance. This natural coloration may alter the finished shade of the candle.
For example, a fragrance oil with a yellow tint may warm a white, blue or pale pink candle color. Fragrance oils containing vanillin may also cause discoloration over time.
Create your color test using the complete formula—including the wax, fragrance oil and additives—rather than testing the dye in plain wax alone.

Can You Mix Candle Dye Colors?
Yes. Candle dyes can be combined to create custom shades. Mixing colors allows you to develop a palette that coordinates with a season, brand identity, fragrance or special event.
Begin with the lighter color and gradually introduce the darker or stronger color. A small amount of a highly concentrated dye can noticeably change the result.
Keep detailed notes for every test, including:
• Wax type and weight
• Dye colors used
• Amount of each color
• Fragrance oil and fragrance load
• Additives
• Final appearance after cooling
Working with small test batches prevents wasted materials while you refine your formula.

Common Candle-Coloring Problems
The finished candle is too light
The wax may naturally create a softer shade, or the formula may not contain enough dye. Add color gradually and test again. Remember that soy wax commonly produces more muted colors than paraffin wax.
The finished candle is too dark
Add uncolored wax to dilute the shade. Record the additional wax amount so you can calculate the corrected dye ratio.
The candle has uneven color
Uneven color can occur when the dye is not completely dissolved or the wax is not stirred thoroughly. Make sure the wax is fully melted and mix until the color is evenly distributed.
Specks of dye are visible
Visible particles may indicate that the solid dye did not completely dissolve. Confirm that the wax is at the appropriate temperature for adding the selected dye and allow enough time for thorough mixing.
The color changes after adding fragrance
The fragrance oil may have its own color or may interact with the formula over time. Test the candle with the exact fragrance oil you plan to use.
The candle does not burn properly
Using too much colorant—or using a pigment not designed for wicked candles—may interfere with wick performance. Conduct a complete burn test whenever you change the dye, wax, fragrance or formula.

Does Candle Dye Affect Wick Performance?
Candle dye can affect how a candle burns, particularly when it is used in high concentrations or contains pigments that do not dissolve completely.
Any change to a candle formula can influence performance. After adjusting the color, conduct a complete burn test and observe:
• Flame height
• Melt-pool development
• Wick behavior
• Sooting or smoking
• Wax remaining around the sides of the vessel
• Performance near the middle and bottom of the candle
Do not assume that a wick that worked in an undyed candle will perform identically after color and fragrance are added.
How to Test Candle Colors
A quick cooled-wax sample can help you evaluate color, but it does not replace a complete candle test.
For reliable results:
1. Prepare a small batch using your intended wax, dye, fragrance and additives.
2. Record every measurement.
3. Pour the candle into the vessel or mold you plan to use.
4. Allow it to cool and cure according to the wax manufacturer’s instructions.
5. Evaluate the color under different lighting conditions.
6. Conduct a complete burn test.
7. Adjust only one part of the formula at a time.
Changing one variable at a time makes it easier to identify what improved—or negatively affected—the candle.

Choosing the Right Candle Dye
Choose your candle dye according to your production needs:
• Dye chips are convenient for small batches and easy color measurement.
• Dye blocks work well when you want to shave or weigh portions for different batch sizes.
• Liquid dye allows gradual, precise color adjustment.
• White dye flakes help brighten wax and create a whiter finished appearance.
No matter which form you choose, successful candle coloring depends on careful measurement, thorough mixing and testing.